用 Apache, nginx, PHP 架網站要注意的安全事項

在 Linux 底下,拿 Apache 或 nginx + PHP 是架網站非常常見的組合 (LAMP/LNMP),這篇要筆記一下怎麼藏伺服器相關的版本資訊

對於開發平台來說這些 http header 資訊可以幫忙除錯,但對於開放使用者存取的服務,若非使用上的需求,建議是把相關的 http header 藏起來,減少資訊洩漏

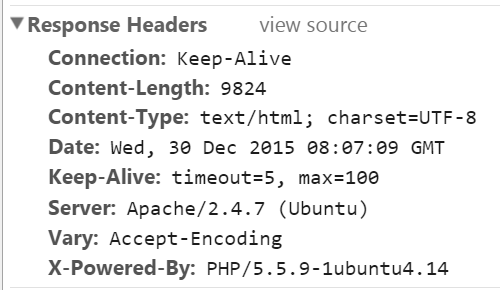
ubuntu_apache_php_header_in_chrome
圖例,用 Chrome 瀏覽器看出 Server版本為 Ubuntu 14.04 + Apache 2.4.7 + PHP 5.5.9

本篇拿 Ubuntu/Debian based GNU/Linux 示範,開始動手之前,大家可以先用 curl 這個工具把網站的 header 撈出來,改完之後就可以比較看看結果!

命令如下,127.0.0.1 請換成自己的網址~

$ curl -LI 127.0.0.1

結果大概會長這樣:

HTTP/1.1 200 OK
Date: Wed, 30 Dec 2015 08:36:26 GMT
Server: Apache/2.4.7 (Ubuntu)
X-Powered-By: PHP/5.5.9-1ubuntu4.14
Cache-Control: no-cache, must-revalidate, max-age=0
Content-Type: text/html; charset=utf-8

有看出端倪了嗎?

接下來講動手做,先說 http 伺服器的部分:

– nginx:
在 nginx.conf 的 http 區段(用大括號括起來的部分)裡面找到 server_tokens 這個設定並設為 off,記得拿掉前面的註解,如果找不到這行也可以自己新增:

server_tokens off;

重啟 nginx 後大功告成:

$ sudo service nginx restart

– apache:
以 Apache 2.4.x為例子,相關設定預設會在 Apache 設定檔路徑 (/etc/apache2) 的 conf-enabled/security.conf 裡面,看設定檔名稱就可以顧名思義知道和安全性有些關係

如果找不到 conf-enabled/security.conf 但找的到 conf-available/security.conf,表示設定檔沒被啟用,可以透過這個命令啟用:

$ sudo ln -s /etc/apache2/conf-available/security.conf /etc/apache2/conf-enabled/security.conf

這邊我們要改兩個設定,分別是 ServerTokens 和 ServerSignature

ServerTokens 會在每一次伺服器回應請求的時候送出,設定值分別有 Full | OS | Minimal | Minor | Major | Prod 這六個選項
從左至右分別為洩漏最多的資訊量到最少的資訊量,預設通常是 OS、建議改成 Prod,這樣就只不會顯示伺服器名稱以外的任何資訊

ServerSignature 不是在 http header 裡面的資訊,但會出現在一些 Apache 自動產生的頁面,顯示出伺服器版本以及 virtual host 等資訊
預設值為 On,這邊為 Off,當 Server 產生一些錯誤或是檔案列表頁面時,就不會洩漏太多的伺服器版本資訊

重啟 Apache 後大功告成:

$ sudo service apache2 restart

改完之後再用curl測試一次結果會發現 Server header 後面版本、系統等資訊都藏好了:

HTTP/1.1 200 OK
Date: Wed, 30 Dec 2015 08:37:20 GMT
Server: Apache
X-Powered-By: PHP/5.5.9-1ubuntu4.14
Cache-Control: no-cache, must-revalidate, max-age=0
Content-Type: text/html; charset=utf-8

但上面的 PHP 還在,而且還看得出來是 Ubuntu 系統,如果你有啟用一些額外的module 可能都會順便被印出來,所以接下來講 PHP:

PHP 這邊要改的這個設定叫做 expose_php,這個設定會放在 php.ini 裡面、預設是 On、這邊要調成 Off
expose_php = Off

如果該選項為 On,則 http header 裡面會含有一個 X-Powered-By 的資訊,除了讓大家知道你用的是 PHP 以外,還有使用到的相關模組,還有可能會因此透漏PHP以及作業系統的版本,因各個unix系統幾乎都有自己維護的套件版本,在編譯時可能會因此把作業系統及其版本資訊包進去(如 5.4.4-14+deb7u9 就透漏了他可能正在使用 Debian Wheezy (7.x)),這個資訊不關的話,Apache2的 ServerTokens 很有可能就白設了XD

改完後這邊要重啟的服務因人而異,如果是 PHP 搭配 nginx 可能是要重啟 php-fpm 或 php-cgi,如果是把 PHP 編成 Apache 的 module 的話就是重啟 Apache

重啟後大功告成(自己看要重新啟動哪個服務~因人而異):

$ sudo service apache2/php-fpm/php-cgi restart

HTTP/1.1 200 OK
Date: Wed, 30 Dec 2015 08:39:05 GMT
Server: Apache
Cache-Control: no-cache, must-revalidate, max-age=0
Content-Type: text/html; charset=utf-8

恩,有沒有看到 X-Powered-By 不見了?

補充一點,php.ini 可能因為不同的 PHP 使用方式 (apache module / cgi / cli 等) 會有 “很多份”,以 php5 為例,如果你是用 Apache 的 php module,則設定檔會在 /etc/php5/apache2/,若是使用 command line的 PHP,設定檔會在 /etc/php5/cli/,真的不確定的話 … 保險起見,可以將 /etc/php5/ 底下一層各個目錄都翻一下,每份 php.ini 都改一改 (mods-available 是放模組的就不用了)

最後補充,以上方法僅用於 “藏” 資訊,對於找工具針對特定版本伺服器的攻擊也許有點幫助,但並不能真的提升伺服器以及網頁程式本身的安全性,不能就此掉以輕心! 程式面該過濾、跳脫、阻擋的還是要做,永遠不能相信client傳過來的訊息啊~!

另外有一些像是 libapache2-mod-security2 這類的工具可以幫忙防禦一些常見攻擊或是弱點,不過設定不好的情況下也是有很大機率遇到其他狀況,要不要用就見仁見智了,我是遇過用了 mod security 之後預設設定會造成 Discuz 的上傳故障的問題 …

Debian/Ubuntu based GNU/Linux 常用軟體

筆記一下可以直接透過 apt-get / aptitude 安裝的套件名稱

不同分支以及不同版本所內建的軟體會有所不同,可能部分套件已經有安裝過了,但透過套件管理程式下去安裝也沒影響就是了 ~ 有些靠相依性一起帶起來的套件也不一一列舉了 … 現在比較常使用的 OS 是 Linux Mint,based on Ubuntu,有些套件 Debian 不見得會有 :S

在文字介面跑的程式:
apt-file aptitude apt-show-versions aria2 bash-completion colordiff command-not-found cpu-checker curl debian-goodies dmidecode dstat ethtool exfat-fuse fail2ban fbterm gdebi geoip-bin git glances hdparm htop iftop inxi iotop iperf iperf3 irssi jq lm-sensors lsof lynis mailutils make moc mosh mtr-tiny needrestart nmap ntpdate openjdk-7-jre openssh-server p7zip-full p7zip-rar parallel pbzip2 pigz ppa-purge pv pxz realpath rename sensord smartmontools software-properties-common sudo sysstat tcpdump timelimit tmux tree ufw unattended-upgrades ioping unzip vim vnstat w3m whois xfsprogs xterm youtube-dl zram-config

圖形介面:
chromium-browser chromium-browser-l10n firefox firefox-locale-zh-hant pidgin qupzilla pepperflashplugin-nonfree terminator konsole update-notifier command-not-found mplayer skype wine freerdp-x11 libfreerdp-plugins-standard im-config gcin gcin-qt4-immodule gcin-gtk3-immodule gparted gsmartcontrol libreoffice-l10n-zh-tw hardinfo

開發才會用到的工具:
nodejs-legacy nodejs npm codeblocks codeblocks-contrib eclipse eclipse-cdt openjdk-7-jdk build-essential cmake libtool gettext libncurses5 gcc-multilib g++-multilib autoconf

比較少用到的開發相關工具:
qt-sdk qtcreator git-core git-svn git-cola subversion mercurial bzr clang android-tools-adb flex bison

架設LAMP(Linux+Apache+MySQL+PHP)伺服器(直接把php當成apache的module來用的作法):
apache2 libapache2-mod-php5 php5 php5-mysql
(視情況額外加入如php5-sqlite、php5-mysqlnd、php5-curl、php5-memcache等…)

設定 FreeBSD update & ports & package 使用 local mirror server

2016/1/20更新:
今天測試, freebsd-update,portsnap 和 pkg 的 tw mirror 已經失效

( 在 Facebook FreeBSD Taiwan 社團看到 消息 表示已經有自動台灣分流了,只是不知道為什麼我都會看到從 aws ec2 抓檔案 )
至於 make.conf 的部份還是可以繼續使用 (也強烈建議使用),在 build ports 的時候對下載 source code 的速度幫助很大!

FreeBSD 上常用來更新系統以及套件的工具的 mirror 設定:

設定檔位置:
/etc/freebsd-update.conf
/etc/portsnap.conf (使用portsnap更新ports才會有)
/etc/pkg/FreeBSD.conf (使用pkgng管套件才會有)
/etc/make.conf (可能需要自行建立)

/etc/make.conf 的部分,自行加入或修改現有的 MASTER_SITE_OVERRIDE / MASTER_SITE_BACKUP:
(這部份是在編 ports 的時候拉 src / tarball 會用到)

MASTER_SITE_BACKUP?= \
http://ftp.tw.freebsd.org/pub/FreeBSD/distfiles/${DIST_SUBDIR}/
MASTER_SITE_OVERRIDE?= ${MASTER_SITE_BACKUP}

/etc/freebsd-update.conf 的部分 (freebsd-update):
ServerName update.FreeBSD.org
改成
ServerName update.tw.FreeBSD.org

/etc/portsnap.conf 的部分 (portsnap):
SERVERNAME=portsnap.FreeBSD.org
改成
SERVERNAME=portsnap.tw.FreeBSD.org


/etc/pkg/FreeBSD.conf 的部分:
url: "pkg+http://pkg.FreeBSD.org/${ABI}/latest",
改成
url: "pkg+http://pkg.tw.FreeBSD.org/${ABI}/latest",

tw 的部分看所在地區再做調整即可,台灣地區 mirror list 可以參考:
http://wiki.tw.freebsd.org/doc/freebsd_taiwan_mirror_sites

FreeBSD 官方放的 mirror list 可以參考這一份:
http://www.freebsd.org/doc/handbook/mirrors-ftp.html

設好 mirror 之後要裝套件速度真的會快很多!

Linux 使用者群組設定、透過 group 來給 sudo 權限 (比改 sudoer 方便!)

一般要透過 sudo 的機制給使用者 root 權限比較常看到的好像是編輯 sudoer 這個檔案 、直接把對應的使用者帳號加入列表的作法,不過每次有新帳號需要 sudo 權限的時候都要做 visudo 自己編輯 sudoer 很麻煩,不小心可能還會改壞檔案(如果這時候沒有 root 的密碼可能就只能透過 single-user mode 進行救援了!),量大的時候用群組來管理 sudo 權限會簡單一點,而且透過群組的方式還可以更容易地進行權限控管,未來要移除使用者時也不必再次編輯 sudoer 的紀錄手動將使用者移除!

sudoer (Ubuntu 上的套件版本 1.8.9p5-1ubuntu1) 裡面部份的設定及說明:

# Members of the admin group may gain root privileges
%admin ALL=(ALL) ALL

# Allow members of group sudo to execute any command
%sudo ALL=(ALL:ALL) ALL

可以看的出有預設的群組可以用 (admin, sudo、不同的系統可能會有略有出入),如果不合用的話(例如預設的這兩個群組權限太高、什麼事情都能做),也可以另外自己建立群組、加新規則限制能執行的命令,不過一般自己在使用的主機、甚至一些學校或中小企業沒有嚴格進行權限控管時,權限通常會直接開到最大(比較省事),所以直接把使用者加入 sudo 群組會最方便快速

修改使用者群組可以透過直接編輯 /etc/group 這個紀錄群組資訊的檔案,也可以透過簡單的命令操作來把使用者加入群組,以下是一些使用 usermod / useradd 指令把使用者加至群組的範例(這邊不考慮使用 nis/yp 控管使用者帳號的情況)

把現有的使用者加入某群組:

$ sudo usermod -a -G groupname username

or

$ sudo adduser username groupname

( groupname 代表群組名稱、username 代表使用者名稱,注意上下兩種用法的參數順序)

把現有的使用者加入某”些”群組:

$ sudo usermod -a -G groupname,groupname2,groupname3 username

調整某使用者的主要群組:

$ sudo usermod -g groupname usernam

也可以在新增使用者的時候就把某使用者加入某群組:

$ sudo useradd -G groupname username
$ sudo useradd -G groupname,groupname2,groupname3 username

或是在新增使用者的時候就指定主群組:

$ sudo useradd -g groupname username

比較要注意的地方:參數小寫 g 是指主群組,大寫 G 是指副群組

另外就是 sudoer 檔案更改後基本上是馬上生效,因為 sudo 每次執行都會去檢查該設定,但透過 group 加群組之後使用者要重新登入才能讓群組生效,這是比較不一樣的地方。

如果在 FreeBSD 上要把某個 user 加入某個群組該怎麼做呢?

$ sudo pw groupmod groupname -M username

恩,大概就這樣吧XD